This article describes how to set watchpoints in COBOL programs.
Watchpoints are special breakpoints that pause the execution of a application , when the value of a data item is modified.
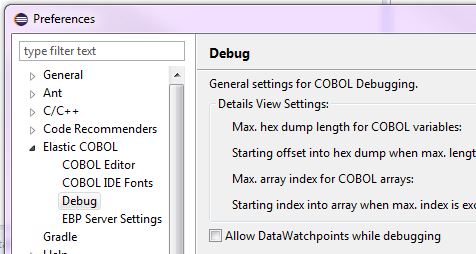
Beginning version 17.10.11, the support for watchpoints has been made optional and can be controlled by the user. Using the Eclipse IDE menu, go to "Window\Preferences\Elastic COBOL\Debug" pane. Use the "Allow DataWatchpoints while debugging" check button to enable/disable support. Refer fig below.
To set a watchpoint , start the program in the debug mode. Open the COBOL Variables view. If the view is not open, you can open it by selecting from the Menu - Window/Show View/Other.../ [COBOL] Variables View.
In the COBOL Variable view, select the variable you wish to watch and right click. The popup menu will give you a list of options which includes "Watch Variable". Select the option to set the watchpoint on the variable. Refer to Fig(1) below.
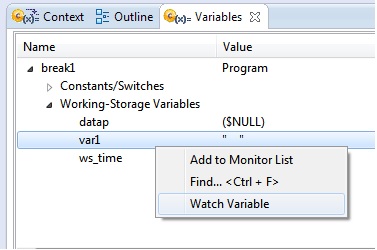
Fig(1).
Once the watchpoint has been set you can view/modify the watchpoint in the breakpoints view.
The watchpoints will appear under the sub group of COBOL WatchPoints.
Refer to Fig(2) below.
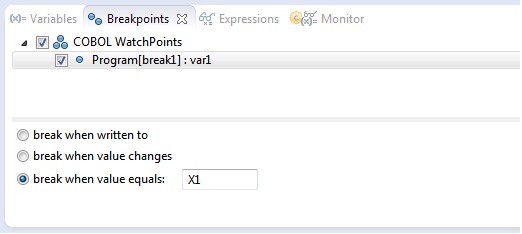
Fig(2).
When you select the watchpoint in the breakpoints view, the detail pane will show the settings for the watchpoint.
The default is to pause execution whenever the COBOL field is written to. The other options are to pause only when the value changes Or when the value equals a user specified value. Note for pointer type data, only the default option is available.
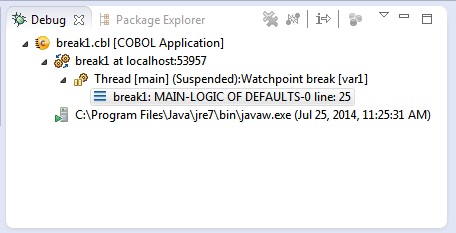
Once the watchpoint has been set, the user can continue with the program execution. If the specified watchpoint condition is met then the program will suspend execution. The thread title will notify the user that the suspension is due to a watchpoint break and the name of the variable that caused the break as shown in Fig(3) below.
0 Comments